Overview
- ASA support single mode and multiple mode
- By default cisco ASA use single mode (check with command show mode)
- Multi mode can use to create virtual firewall (its depend with license we have – show versions)
- By default we have 2 built-in context-systems and admin (dont count the license) cannot delete and mandatory.
- Context-systems: Used to manage physical resources of the Physical ASA, cant given IP address its only available trough console
- admin: used to create or manage system context remotely.
Prerequisites Multi Context
- License check
- Ensure every interface context has unique ip address
- Ensure every context is assigned a unique interface
- If unique interface cannot be assigned, then ensure every interface context has unique mac address (mac-address auto ) commands
Topology

Testing Scenarios
- Create two virtual firewalls named CustomerA and CustomerB. Ensure R2 and R3 can telnet 5.5.5.5.
- R2 and R3 have already been pre-configured with IP addresses and routing. Configure ASAx1 with the IP address as 192.168.20.2 for Inside interface of CustomerA and 200.0.0.20 for Outside interface of CustomerA. Configure ASAx1 with the IP address as 192.168.10.2 for Inside interface of CustomerB and 200.0.0.10 for Outside interface of CustomerB.
Configurations
ASA devices
- Enable mode multicontext and define interface for each context
mode multicontext
int range eth0-4
  no shut
# after cisco asa reboot create context and associate interface for each context
context CustomerA
  allocate-interface Ethernet0
  allocate-interface Ethernet1
  config-url disk0:/customerA.cfg
!

context CustomerB
  allocate-interface Ethernet0
  allocate-interface Ethernet2
  config-url disk0:/CustomerB.cfg
!
# enable mac address generate to create unique mac address on sharing ethernet 0
 mac-address auto
2. Configure Context for Customer A
changeto context CustomerA
interface Ethernet0
 nameif OUTSIDE
 security-level 0
 ip address 200.0.0.20 255.255.255.0
!
interface Ethernet1
 nameif INSIDE
 security-level 100
 ip address 192.168.20.2 255.255.255.0
!
route OUTSIDE 0.0.0.0 0.0.0.0 200.0.0.1 1
3. Configure context for Customer B
interface Ethernet2
 nameif INSIDE
 security-level 100
 ip address 192.168.10.2 255.255.255.0
!
interface Ethernet0
 nameif OUTSIDE
 security-level 0
 ip address 200.0.0.10 255.255.255.0
!
route OUTSIDE 0.0.0.0 0.0.0.0 200.0.0.1 1
4. some verification command to multicontext
show mode
show running
R5
interface Loopback0
 ip address 5.5.5.5 255.255.255.255
!
interface Loopback1
 ip address 5.50.50.50 255.255.255.255
!
interface Ethernet0/0
 ip address 200.0.0.1 255.255.255.0
 duplex auto
!
line vty 0 4
 password cisco
 login
 transport input telnet
!
ip route 192.168.10.0 255.255.255.0 200.0.0.10
ip route 192.168.20.0 255.255.255.0 200.0.0.20
Verifications
we can testing the scenario telnet from each R2 and R3
R2
telnet 5.5.5.5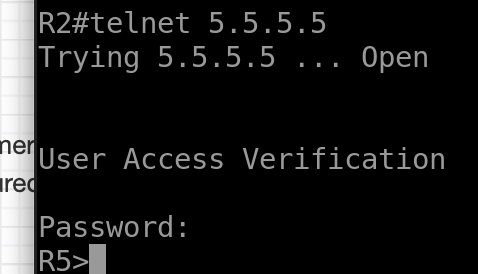
R3
telnet 5.5.5.5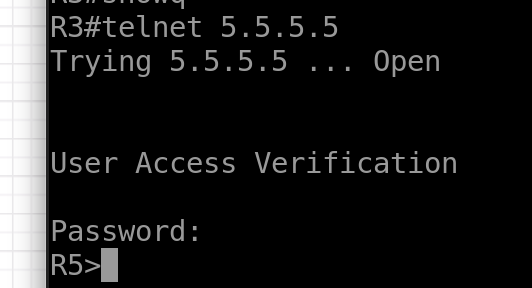
Conclusions
- We can use multi context to create virtual firewall, with this we can minimize minimize to buy new physical firewall.
- In cisco ASA we can single interface used by multiple context but with unique mac address.
If you found this useful, subscribe to newsletter